


STEM: Bridging the Gap
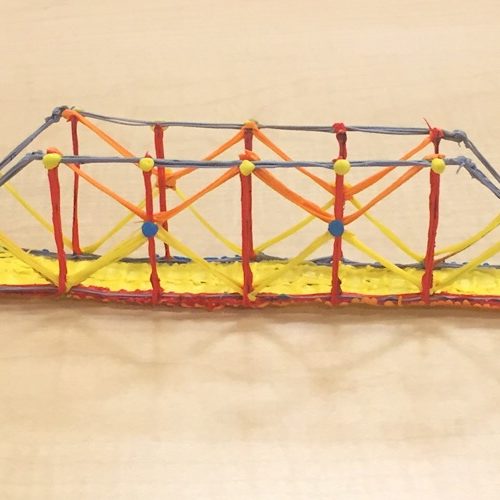
In this activity, students will work in pairs to design a bridge that can withstand the heaviest amount of weight when spanning a gap of 20 cm using a 3Doodler and no other materials.
Knowledge
Students have
researched different types of bridges.
researched different types of bridges.
Objectives
Students will
recognize that 3D shapes are composed of 2D shapes.
doodle a model of a slice of a shape.
explain their solutions to the class.
recognize that 3D shapes are composed of 2D shapes.
doodle a model of a slice of a shape.
explain their solutions to the class.
Materials
Students will need
3Doodler (1 per pair)
pencil (1 per student)
graph paper (1 per student)
ruler (1 per student)
matchbox car (1 per pair)
balance weights, pennies, or stones (for testing the weight of each bridge)
3Doodler (1 per pair)
pencil (1 per student)
graph paper (1 per student)
ruler (1 per student)
matchbox car (1 per pair)
balance weights, pennies, or stones (for testing the weight of each bridge)
Lesson Plan
Instructions
Step 1 - PREPARATION
Project your computer or tablet screen on the board for students to view various types of trusses. Note that this should serve as a review. Students should research bridge construction and design before undertaking this project.
Step 2
Share the goal: Students will work in pairs or trios to doodle a bridge that can span a gap 20 cm using only a 3Doodler and Eco Filament Sticks. Pass out the Bridge Checklist Sheets to each group.
Step 3
Share the criteria and constraints:
a) construct a 26 cm bridge using 20 or less Eco Filament Sticks.
b) each Eco Filament stick will cost the group $1.00.
c) the deck must be wide and smooth enough for a matchbox car to roll over it from end to end.
d) the winning bridge will support the most amount of weight on its deck without cracking and be the most cost-effective.
e) the bridge must incorporate structural elements of bridges, e.g., trusses, beams, bracing, triangular supports, etc.
f) the bridge may be a new design or a recreation of an existing design.
Step 4
Instruct students to think about the weight that the bridge will hold, as well as its aesthetic appeal. Other important focus points include its center of gravity and symmetry, which can affect both the aesthetics and the strength of a bridge. Note that the deck will need to extend beyond either end so that it can be anchored in place on two desks.
Step 5
Model how to create a stencil for a bridge using graph paper, a ruler for measurement and drawing straight, accurate lines. Be sure each student has a pencil with a good eraser. Each group member should sketch his or her own plan. Group members will later meet to discuss and agree upon which group member's plan will be used to doodle their bridge.
Step 6
After students have decided on a plan, Xerox a copy of the plan for each group member, so that multiple members may be doodling different parts of the bridge at the same time.
Step 7
Model how to weld parts together. Two students can work together on welding. One can hold the parts together, while the other uses the 3Doodler to weld the pieces with filament extruded from the pen.
Step 8
After students' plans have been approved, hand out the 3Doodlers and copied plans for students to begin. Circle to assist and assess.
Project your computer or tablet screen on the board for students to view various types of trusses. Note that this should serve as a review. Students should research bridge construction and design before undertaking this project.
Share the goal: Students will work in pairs or trios to doodle a bridge that can span a gap 20 cm using only a 3Doodler and Eco Filament Sticks. Pass out the Bridge Checklist Sheets to each group.
Share the criteria and constraints:
a) construct a 26 cm bridge using 20 or less Eco Filament Sticks.
b) each Eco Filament stick will cost the group $1.00.
c) the deck must be wide and smooth enough for a matchbox car to roll over it from end to end.
d) the winning bridge will support the most amount of weight on its deck without cracking and be the most cost-effective.
e) the bridge must incorporate structural elements of bridges, e.g., trusses, beams, bracing, triangular supports, etc.
f) the bridge may be a new design or a recreation of an existing design.
Instruct students to think about the weight that the bridge will hold, as well as its aesthetic appeal. Other important focus points include its center of gravity and symmetry, which can affect both the aesthetics and the strength of a bridge. Note that the deck will need to extend beyond either end so that it can be anchored in place on two desks.
Model how to create a stencil for a bridge using graph paper, a ruler for measurement and drawing straight, accurate lines. Be sure each student has a pencil with a good eraser. Each group member should sketch his or her own plan. Group members will later meet to discuss and agree upon which group member's plan will be used to doodle their bridge.
After students have decided on a plan, Xerox a copy of the plan for each group member, so that multiple members may be doodling different parts of the bridge at the same time.
Model how to weld parts together. Two students can work together on welding. One can hold the parts together, while the other uses the 3Doodler to weld the pieces with filament extruded from the pen.
After students' plans have been approved, hand out the 3Doodlers and copied plans for students to begin. Circle to assist and assess.
Wrap Up
Once students' bridges are doodled, you can test them, one at at time, by placing them between two desks 20 cm apart and anchoring each side with books.
First roll a matchbox car through to see if the deck is wide and smooth enough for the car to make it from one end to the other.
Use small weights, pennies, or stones, adding one at a time to test strength. Record the number of weights as you add them so you know how many weights each bridge was able to hold before each reached their breaking point.
Assessment
Possible Extensions
Before each bridge is tested, have students record their estimate for the maximum load of that bridge. After all the testing is complete, have them plot their estimates, alongside the actual load for each bridge. Did they get better at estimating over time? Collect the class’s estimates and calculate descriptive statistics like mean, median, standard deviation, and range. How did the average error and standard deviation of the estimates change as the tests went on? Did observing more tests improve their ability to estimate strength?
Vocabulary
2D - of, relating to, or representing something in two dimensions.
3D - of, relating to, or representing something in three dimensions.
angle - the (rotational) space between two intersecting lines.
collaboration - to work jointly with others or together especially in an intellectual endeavor.
creative thinking - a way of looking at problems or situations from a fresh and imaginative perspective.
math - the science of numbers and their operations, interrelations, combinations, generalizations, and abstractions and of space configurations and their structure, measurement, transformations, and generalizations.
measurement - the act or process of measuring; a figure, extent, or amount obtained by measuring.
problem-solving - the process or act of finding a solution to a problem.
reasoning - the drawing of inferences or conclusions through the use of reason.
Educational Standards
Engage effectively in a range of collaborative discussions (one-on-one, in groups, and teacher-led) with diverse partners on grade 7 topics, texts, and issues, building on others' ideas and expressing their own clearly.
Students will work in small groups to design a plan for a bridge that will hold the most weight before breaking. Students must consider the feedback of group members, as well as members of the classroom throughout the design, discussion and feedback process.
Engineering Design: Define the criteria and constraints of a design problem with sufficient precision to ensure a successful solution.
Students will consider the design criteria and constraints in relation to the design and final outcome of their doodled bridges.
Engineering Design: Evaluate competing design solutions using a systematic
process to determine how well they meet the criteria and constraints of the problem.
Students will evaluate and consider the design solutions of other group members and determine the best plan to doodle for the final weight-bearing challenge.
Use technology to seek feedback that informs and improves their practice and to demonstrate their learning in a variety of ways.
Students will use a 3Doodler to doodle a structurally sound bridge that will support the most weight.
Exhibit a tolerance for ambiguity, perseverance and the capacity to work with open-ended problems.
Students will consider various design options before settling on a design for their doodled bridge.
Communicate complex ideas clearly and effectively by creating or using a variety of digital objects such as visualizations, models or simulations.
Students will use a 3Doodler to communicate their bridge design to be used in a weight-bearing simulation.
Use collaborative technologies to work with others, including peers, experts or community members, to examine issues and problems from multiple viewpoints.
Students will share a 3Doodler to doodle a structurally sound weight-bearing bridge.
More Lesson Plans

 - 3Doodler")
 - 3Doodler")