Artist Spotlight: Ricardo Martinez

3Doodler is delighted to work with a range of artists this year to invite curiosity and spark the imagination as we design and create in 3D.

Each month, the 3Doodler team shares ideas and tutorials to help kick-start the design process. We were curious to see what our artist community would create with the same inspiration.

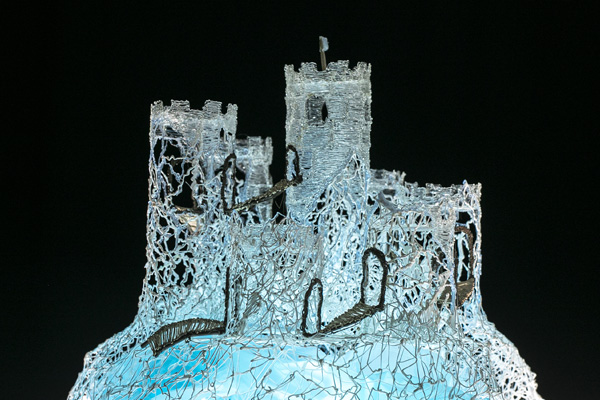
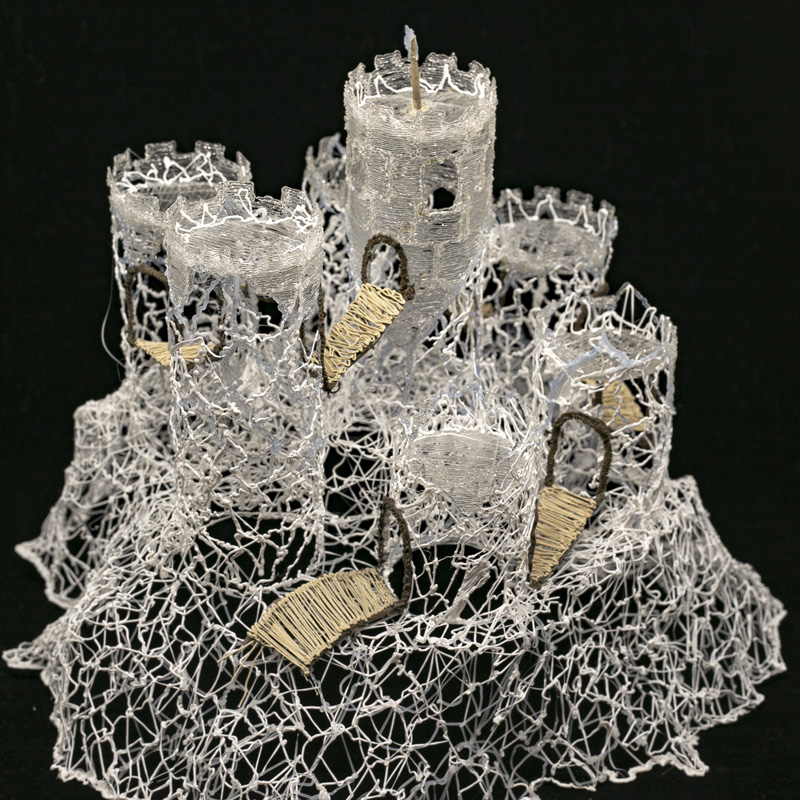
Last week, we explored the artistry of ice castles. 3Doodler shared a version that is easy to replicate with our free stencil and tutorial. This week, guest artist Ricardo Martinez (riikc) shared his version of an ice castle. See where he found his inspiration and how the sculpture came together.

Creating with riikc

Ricardo is a sculpture artist, painter, and photographer who explores a variety of materials and techniques in his work. Ricardo has extensive experience creating art with 3D pens and often shares his approach with the 3Doodler community.

Ricardo’s latest installation, Memento Vivere, gained worldwide attention as an interactive multi-disciplinary project using light, technology, and science to express an idea. This larger-than-life exhibit consists of a series of electroluminescent cables arranged in a skull structure that Ricardo designed with a 3D pen. The sectors of the installation light up as people interact with the display.

Ricardo lives in Brussels and travels extensively. He takes inspiration from nature, landscapes, geography, architecture, and much more. We were delighted to connect with him about his experience creating an ice castle in 3D.


  • 3D pen art: Large white castle with clock on top
  • White lace castle sculpture in 3D pen art.
  • 3D pen art: Castle with glass sculpture and bird
  • 3D pen art: Ice and rope sculpture on table - Castle 1

3D Design Approach

Ricardo had an idea for this design and took inspiration from fantasy video games he’s played over the years, like Final Fantasy. From his home in Brussels, he looks at a large church with a castle-like appearance and eight pillars. Mixing these concepts, he began to sketch the design on paper.

“It seems like a different part of your brain kicks in and starts working as you start building,” said Ricardo. “The design evolves as you go. The castle resembles the sketch but evolved as I sculpted it in 3D.”

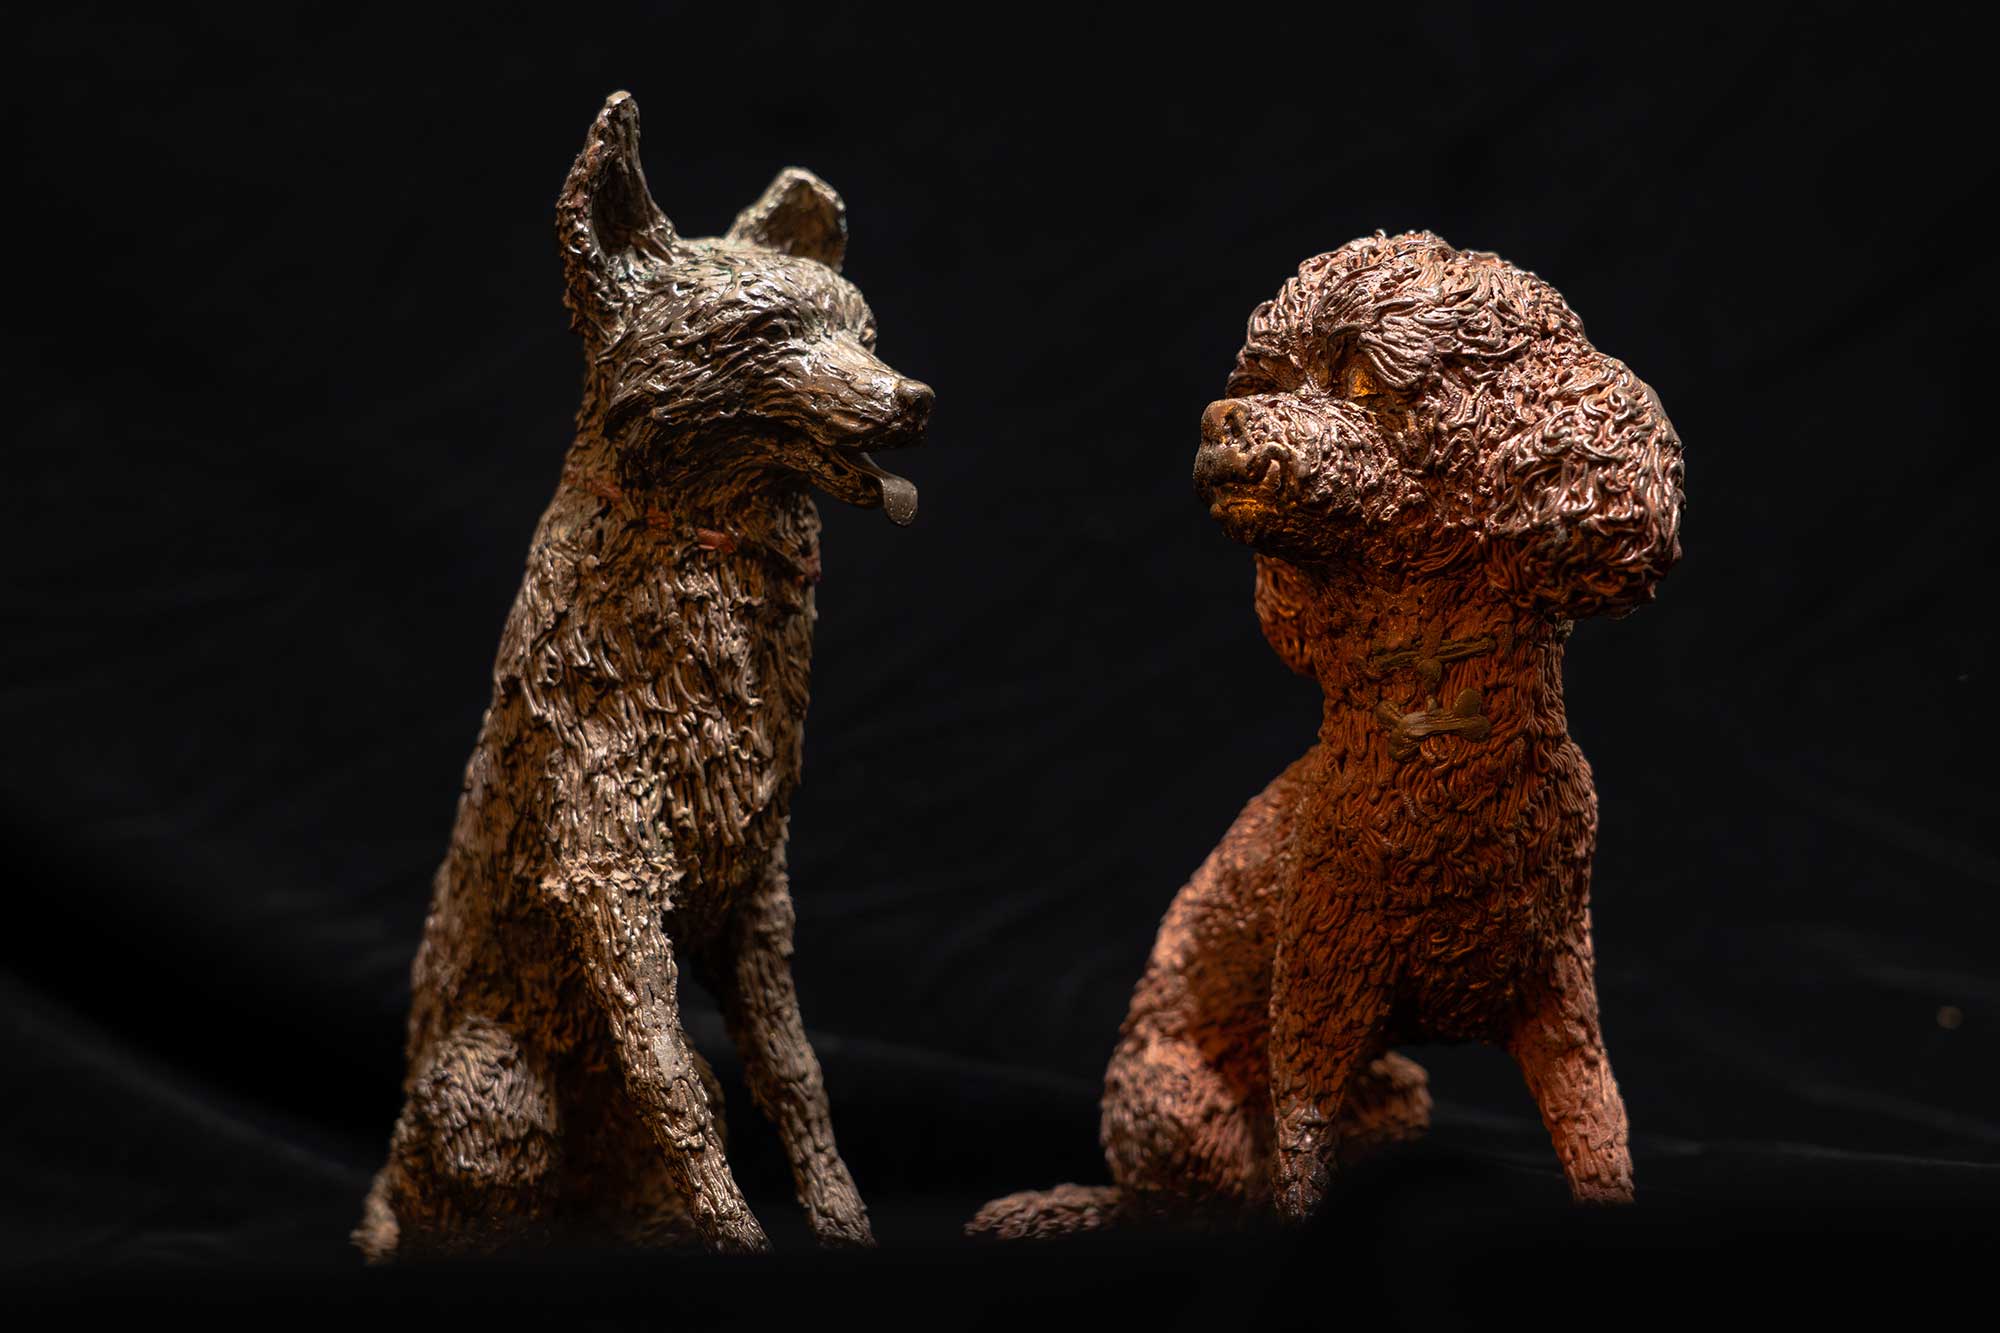
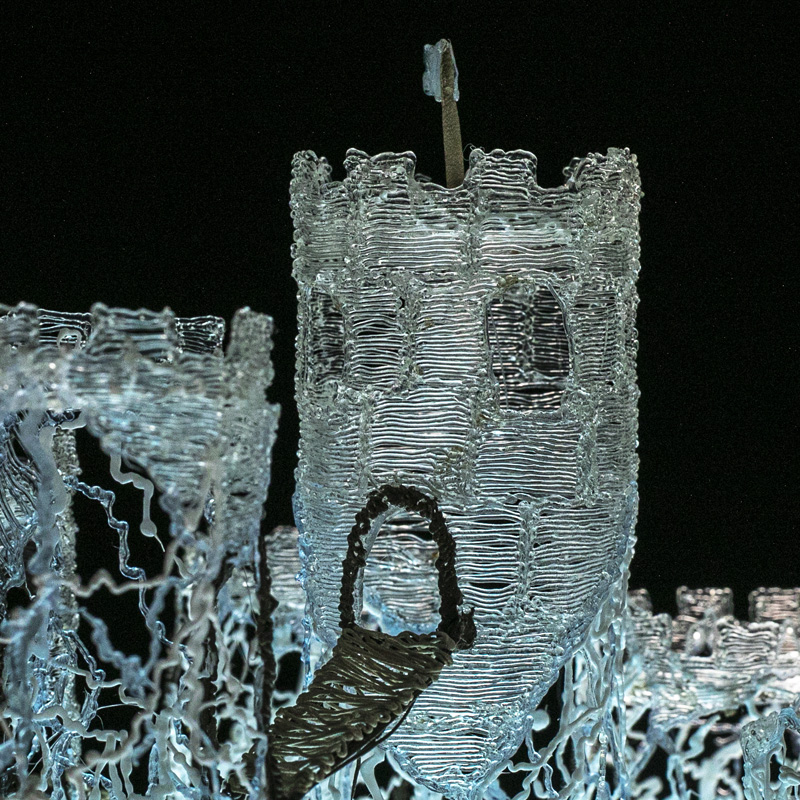
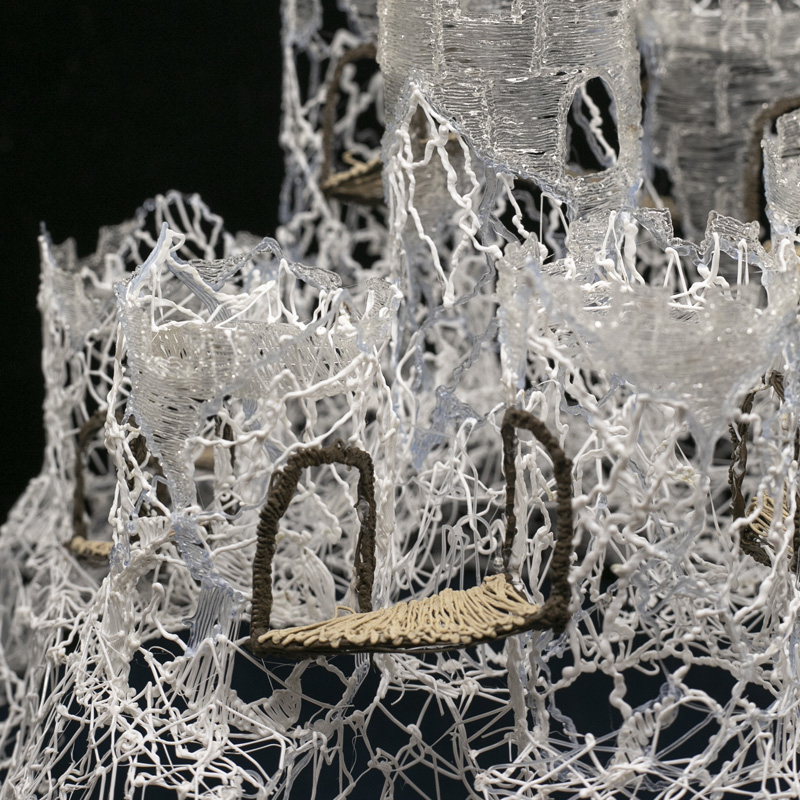
Ricardo used existing shapes to begin the sculpture and found it easy to keep adding material to get the form he wanted for the design. For example, he used a glass cylinder to create the pillars’ base. He could continue this process to get the length he wanted for the towers.

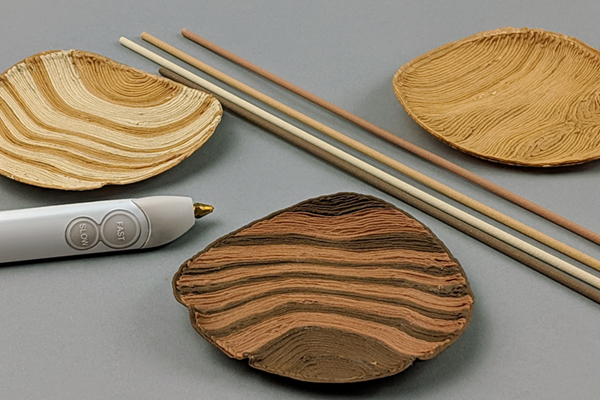
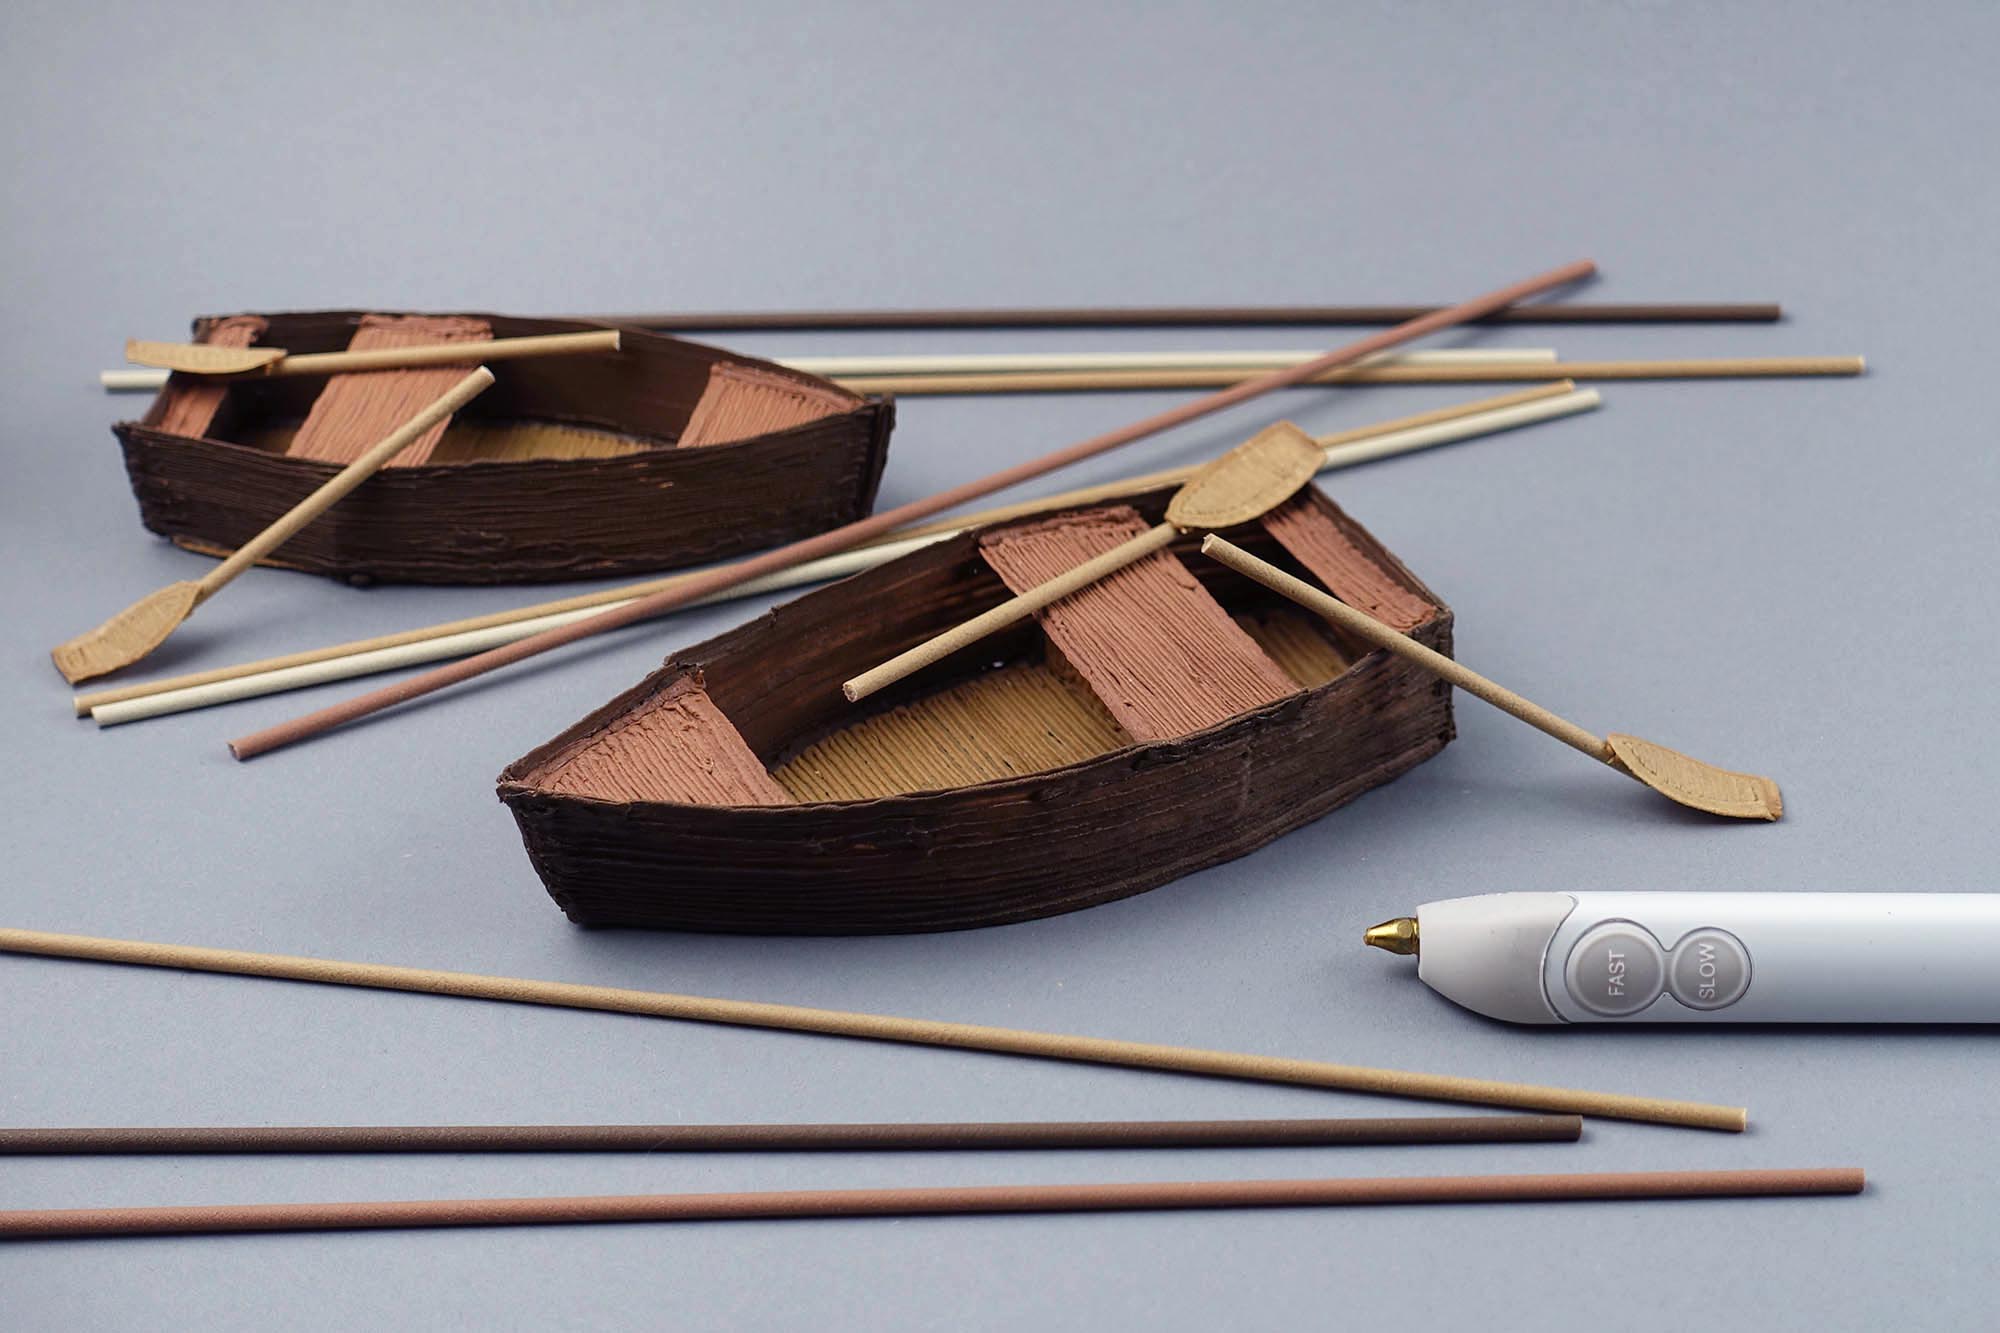
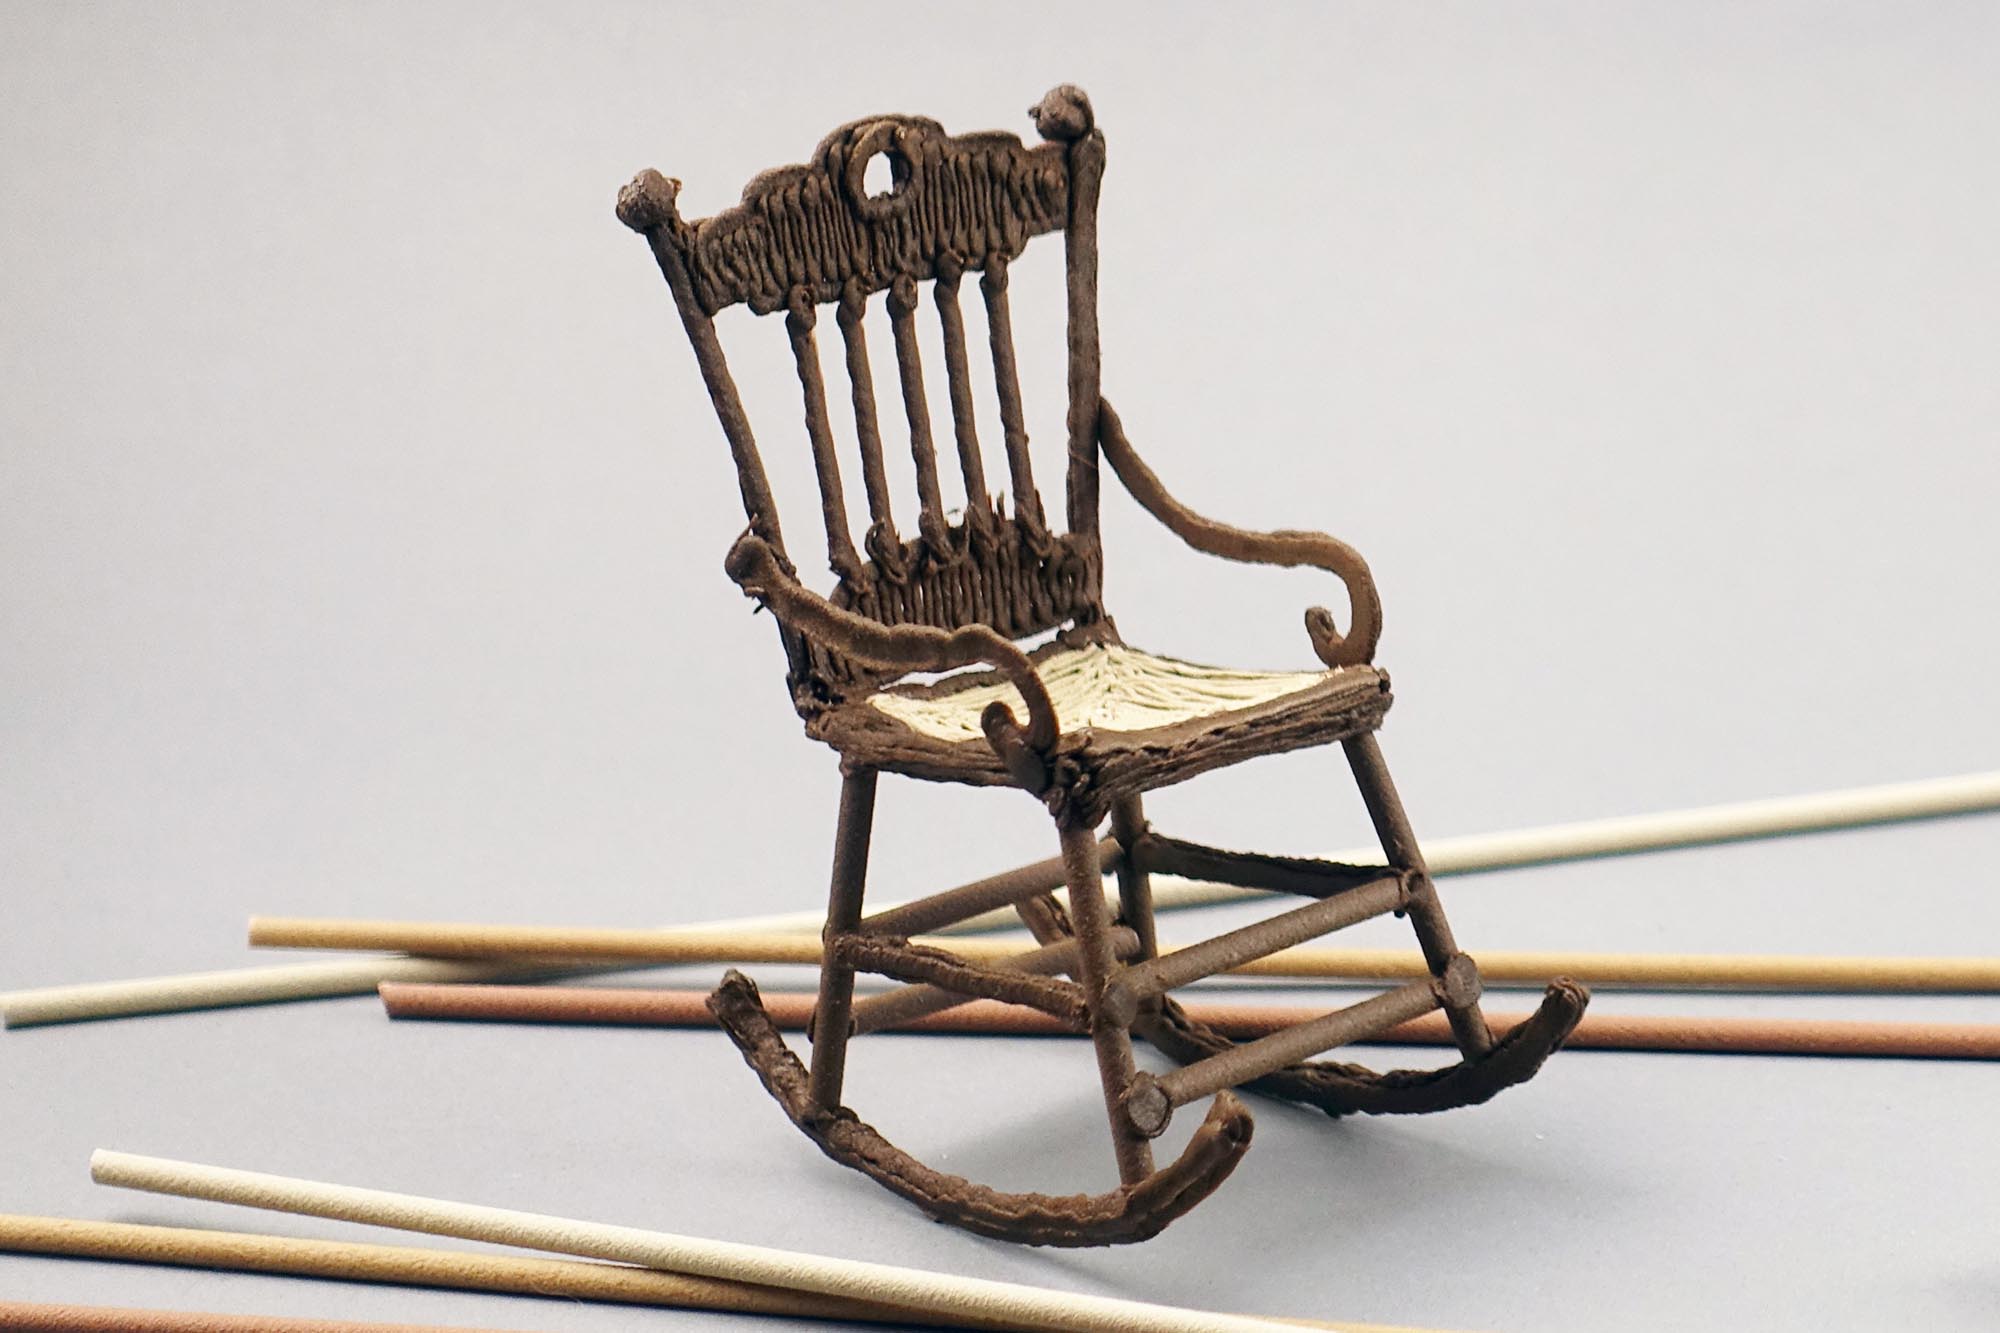
To design the castle, Ricardo used the 3Doodler PRO+ 3D pen and PLA, nylon, wood, and bronze filament.

“I love the smell of the wood while I’m creating. It makes me feel like I’m in a woodshop,” said Ricardo. “For this design, the wood and bronze add texture and stand in contrast to the rest of the design, which is the effect I was hoping to achieve.”

Advice for the Community

Ricardo is an experienced artist who shares his success tips freely to encourage others to pick up a pen, paintbrush, or other tool and begin creating.

“It’s important to share that you don’t need to create shapes out of thin air,” said Ricardo. “I recommend starting by using existing shapes. Then, you can find inspiration and doodle anything with objects around you.”

For new 3D pen artists, Ricardo recommends starting with a speed setting of three and gradually working up to faster settings. In this design, Ricardo found he could work effectively with a speed setting of seven or nine.

“I was impressed with the speed settings on the pen. It’s incredible how adjusting those settings can change things and make the experience much more enjoyable, given how quickly you can cover a large surface,” said Ricardo. “The PRO+ pen is much more comfortable and easier to use over long periods.”

Ricardo notes that the PRO+ makes it easier to swap materials and see what’s happening, which saves a great deal of time. He was especially pleased with how the wood detail came out on the ice castle and enjoyed adding contrast with different materials.

When working in bronze, Ricardo recommends keeping a bit of distance from the tip to the surface as the material smudges easily.

“Working in 3D evolves whatever idea you think you have, and it goes into many different directions that you can’t experience with just 2D drawing. It opens your mind to new possibilities and thinking in ways you’ve never thought before,” said Ricardo.

It’s incredible to see creators at work and watch designs come to life in 3D. Expect more artist and creator collaborations in the months ahead. Share your ideas with us. What would you like to see 3Doodler and our collaborators create? Tag 3Doodler or use #3Doodler #WhatWillYouCreate.

Draw in Wood with the Create+ 3D Printing Pen!

After months of running our Wood filaments through their paces, you can now 3D print in Walnut, Cherry, White Birch and Natural Wood with the 3Doodler Create+ Pen! Now you can make your own wooden sculptures, photo frames, phone cases, or even fix broken floorboards quickly and easily.

Why Wood?!

Made with real wood fiber, all four of our wood filaments allow you to make lightweight structures with a woody finish and a (satisfying) wood aroma. One of the great things about this material is how flexible it is. Prefer a smoother finish? Buff the surface with sanding paper. Want to engrave a message? Carve it with your 3Doodler’s hot nozzle tip. You can also stain the wood to accentuate the detailing of your designs. Want to go truly next level? Apply shellac for a bold glossy finish.

Hey Woody! What shall I make?

With the versatility of our wood filament, the possibilities are as immense as a Giant Sequoia. If you’re new to 3D pen drawing, start with something simple like a Christmas tree for the holidays. Want to build something fun and display-worthy? How about some moveable puppets or these charming row boats (we tested them, and they do float!).

Get artisanal and make yourself a beautiful trinket dish to hold your jewelry and keys. Or if you’re a dollhouse collector, this is the miniature rocking chair mic drop you’ve been waiting for! Finally, for DIYers, go ahead and fix that nagging chip in your floor board in a hot second!

Tips & Tricks
  • When using our 3Doodler Wood filaments with the 3Doodler Create+, make sure to set your pen to the PLA temperature setting and extrude on Slow Speed for the best results.

  • If you are using a Create DoodlePad® , simply flip it over and use the back of it – this makes it easier for you to remove your Doodle after it has cooled and hardened.

Purchase a 3Doodler Create+ Pen and 3D print in Wood now:

3Doodler PRO 3D Pen: Tips for Printing in Wood, Nylon, and Metal

A key differentiator that puts the 3Doodler PRO pen above the rest of our 3D printing pens is the vast array of specialty materials that it’s compatible with. Designed for engineers, architects, designers, artists, and more, this pen has something to offer to each professional in their niche.

With the introduction of new Wood filament colors, we’ve put together a summary of the characteristics of each specialty material (wood, nylon and metals), along with some tips and tricks from Cornelia Kuglmeier, which you might find useful for all types of 3D pen designs.

Pears Doodled with Wood Filaments Pears Doodled with Wood Filaments

Wood

Characteristics
Made with real wood fibre, this material carries a mild and natural wood aroma, and creates a sandy surface appearance when Doodled. Like any wooden material, it can be sanded down to reveal a cleaner finish. You could even stain the wood to give it a darker shade or to accentuate details in certain parts of your design.

  • 3D Pen owl figurine using wood plastics
  • 3D Pen horse figurine using wood plastics

Uses
Wood filaments, are favored by architects who want to add some life-like aesthetic to models, loved by sculptors to make figurines that add a warm feeling to interior decor, and used by the everyday handyman for repairs on wooden furniture, floors, utensils and more.

Doodling Technique
By popular demand, we’ve added 3 new color options (Cherry, Birch and Walnut) (link to AMZ Wood bundle) in addition to the existing Natural shade, to allow for more variety in creations! All Wood filaments have the same characteristics when in use.

The ideal settings for Wood is:
Temp: 170°C – 200°C (338°F – 392°F) / Speed: 3-6

Wood is perfect for:
  • Coating a structure that is pre-built with ABS or PLA plastic.

  • Making flat pieces to assemble together.

  • To make small, delicate pieces, we recommend using speed 1 or 2 to keep the plastic soft and fluid, making it easier to draw finer details, plus adjusting the fan speed allows you to control how fast/slow the plastic hardens.

Koy Fish Handbag Doodled with Nylon Filaments Koy Fish Handbag Doodled with Nylon Filaments

Nylon

Characteristics
Nylon creates a very interesting fabric-like texture with a semi-translucent appearance. When extruded, the material forms sturdy strands that are bendable, but strong enough to hold their structural shape.

  • 3D Pen vase figurine using nylon plastics
  • 3D Pen figurine using nylon plastics

Uses
Designers love using Nylon to make an entire fashion accessory, outfit, or create embellishments to add decorative details to plain items. You could also make stylish home decor with this material, such as subtle wall art made up of dandelions.

Doodling Technique
Although Nylon is only available in one color, you can use fabric dye or food coloring to add some interesting effects to your final design. Here’s an example, using food coloring, of how you can create a beautiful color blending effect.

The ideal settings for Nylon is:
Temp: 200°C – 225°C (392°F – 437°F) / Speed: 3-6 / Fan: medium-high

Nylon is perfect for:
  • Making functional parts or free-form structures.

  • Developing prototypes of clothing designs.

  • When joining nylon to nylon, we recommend turning the pen temperature up to 230°C – 240°C and fan to low, speed to 2 or 3. This helps to create extrusions that harden slower, and are therefore more sticky so you can create stronger connection points. Also, make sure to press the pen firmly onto the Doodled pieces to secure the joint.

  • Mix up your technique and use extruded Nylon filament to weave, crochet or braid to fabricate unique textures.

Theodore & Hepburn in Bronze & Copper by Cornelia Kuglmeier Theodore & Hepburn in Bronze & Copper by Cornelia Kuglmeier

Metal

  • 3D Pen figurine using metal plastics
  • 3D Pen figurine using metal plastics
  • 3D Pen figurine using metal plastics

Characteristics
Bronze and Copper filaments allow you to create 3D structures which can be polished in different ways to get a premium-looking metallic finish. When left untreated, the metals have a clay-like appearance, which is unique in its own way.

Uses
Working with metal offers a very unique experience both while you Doodle, and after. It is ideal for making jewelry pieces and sculptures which may have otherwise required special tools and techniques to create.

Doodling Technique
The ideal settings for both Bronze and Copper is:
Temp: 180°C – 200°C (356°F – 392°F) / Speed: 3-5 / Fan: High

Tips for using Bronze and Copper:
  • Doodle two to three layers to increase the strength of your creation, as these materials are brittle if using a single layer only.

  • For larger pieces, you can create a base structure in ABS or PLA to enhance rigidity.

  • For flat pieces, or pieces with a bigger surface, you can polish with sand paper to achieve a shinier and smoother finish. Start with a rough grit (e.g. 400 grit) to get rid of the overall roughness, then progress to a very fine grit (e.g. 1200 grit) to achieve next-level shine and shimmer. We recommend using wet sanding paper, or polishing paste. Finish off with steel wool.

  • For smaller creations with more crooks and edges, you can use the tumble finishing technique to give it an even more polished look. Fill the barrel with brass screws, put your Doodled piece in and let the machine do its work. Make sure to check on your piece from time to time, to see if it’s been damaged, if so, fix it then return to the tumbler. You will see the effects of this technique after about an hour of tumbling.

  • If the pen has trouble extruding metal filament, we recommend putting the pen on reverse, instead of pushing the filament through by force. If you can’t grip the strand as it is too short, adjust the pen temperature to 130°C, screw off the nozzle tip, then put the pen on reverse again and gently push the plastic out with the cleaning tool provided. Screw the nozzle back on to continue your work.

If you’d like to learn more about the different materials or the 3Doodler PRO pen itself, be sure to check out our dedicated product page.

Close-up: 3D pen art cake with sticks design

Get Inspiration in Your Inbox

Sign up to be the first to have our latest 3D pen lessons, stencils, deals, and discounts (yay!) deposited directly in your inbox.

You have Successfully Subscribed!