Artist Spotlight with Rachel Goldsmith: Beyond Bovine

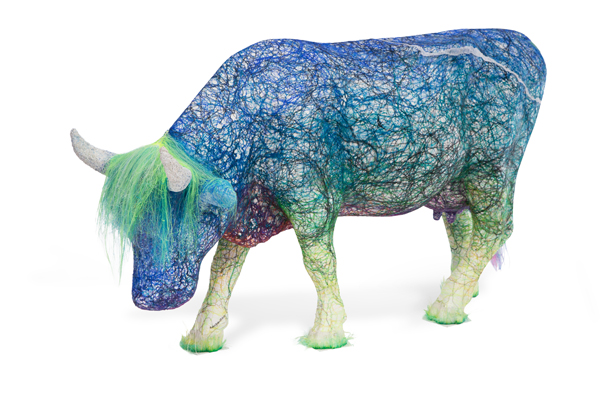
Rachel Goldsmith is a New York and Seattle based artist who paints with PLA plastic on canvas, using a 3Doodler Create+. She recently wrapped up with an incredible fiberglass resin grazing cow that was covered head-to-toe with colorful 3Doodler PLA filament.

Beyond (the name of her cow) was part of CowParade NYC 2021 – a public exhibit that was on display throughout New York City this month. Rachel has been a cornerstone of the 3Doodler community since the beginning, and it’s been a delight to watch her prolific work evolve over the years. We thought this would be a perfect opportunity to check in with Rachel learn more about the project, and to hear about what she has been up to with her art, her hula hooping, and her 3Doodler!

Img

Can you please introduce yourself and talk a little about your artist’s process?

Seven years ago, 3Doodler wrote an Artist Profile on me that ended with this line, “Rachel’s mix of chaotic control reflects what Doodling is at its core: endless experimentation.” … And it’s funny to think back on that time in my creative history – because I could only ever be as good as the pen… The first 3Doodlers had unexpected blips in their extrusion every 7-11ish seconds the pen would pause, maybe… this was chaos that I constantly had to respond to and attempt to control… and I really liked having to respond to the technologies’ whims… but the 3Doodler got better and better (thank you Max and Peter!) and now… I no longer have to control the chaos… I know what to expect from the pen and I have developed and perfected techniques with which I can accurately express myself and with which I can use the medium as my visual language.

The endless experimenting is no longer needed…I’m finally back to creating meaningful fine artworks at a level on par with my previously honed drawing and painting skills. It was a very challenging leap to take…. A full deep dive into 3Doodler-land… and I have no regrets. It has added so much literal depth to the layered essence of my artistry.

Img

We know you are currently working on a cow project, so where did that idea come from, and how is that project coming along? 

For a moment, this past June, I found myself once again dipping my toe into potentially experimental waters. You see… the Official Cow Parade was coming back to New York City with a fully curated group of artists creating cows for God’s Love We Deliver. I read about it online after the launch party, and I reached out to Steven at God’s Love and said, “Please, I have spent 20 years dreaming of participating in this project – can I make a cow?”

And Steven said, “Sorry, we don’t have any extras.” So, I replied, “What if I create a cow that looks like it belongs in your parade but is actually see-through… and not ultimately attached to one of the fiberglass cows. YES! Steven was on board! It would be the world’s first Cow created with a 3 D printing pen for the 100th staging of the cow parade.

So… my plan for the cow threw me back into experimental land… I had an engineering feat to consider that had never impeded my work in the past. I had to create a weather-durable/public-durable free-standing cow. For engineering’s sake, I requested a grazing cow – in case I needed to put a flower below its head to hold it up when it was complete… I also considered making my cow into a bull – adding another “leg” to stand on. Initially, I had only a short amount of time to work on top of the fiberglass cow in the Clear sponsored Artist Studio at Industry City, that I was using as a mold. So not only did I have to hit the ground running, but I had to make sure not to damage the underlying fiberglass structure, prior to another artist painting it.


In my Brooklyn studio, I began extruding PLA in an effort to create a cowhide – basically, I made a ginormous piece of mesh – for days I ironed together layers of extruded PLA. Then I rolled up my ‘hide” and brought it to the life-sized cow, which I immediately covered in heave duty aluminum (both to protect the fiberglass structure and to ensure that in molding my PLA mesh to the form it would not permanently adhere to the fiberglass.

Using a heat gun and a lot of patience, I formed that PLA along the contours of the cow. The hide, though large, wasn’t large enough and I had a lot more PLA to extrude to cover the whole cow… After several days Steven and Leslie (who was running the studio for David Stark Design and God’s Love) and I all decided that given the cow was being created for a public art piece… and cow-hugging is encouraged – it would be best if I kept my final cow on the fiberglass structure (and now there was one available for me to use). So… cut the cowhide off and removed the foil. I then began adhering the PLA directly onto the fiberglass that I had been aiming to remove it from… The plans shifted quickly… The PLA was on its last legs for reheat and cool – remember it had been extruded, then ironed, then heat-gunned… then removed from the foil and fiberglass, and now I was again heating it to adhere and mold to the cow shape. Ay de mi! The whole project basically got three times longer… but this is when the cow really started to gain its own personality!

I was aiming to create a hairy cow – like a highland cow – mainly because with this medium I could make my cow hairy! Where other artists had only used paint to color their cows, I had the ability to extend my cow BEYOND the fiberglass.

My cow’s name, Beyond, stems from other reasons as well… PLA is a plant-based filament and I am a plant-based human… so we have an affinity to Beyond Meat (in a plant-based way). Also, God’s Love We Deliver goes above and BEYOND to help our community on a daily basis. And finally, there are plenty of people who might describe me and my cow as — “beyond”.

For the horns and the hoofs, I melted the PLA in the oven prior to adding it to the cow in order to create a different texture for those areas. I flipped the cow over and working on it upside-down to do the belly and the legs and to grow grass from its feet… (working with gravity for the grass). The grassy feet started out about 8 inches high… and I cut it down half an inch at a time until I was pleased with the height. The hair also got cut and styled a bunch of times… and I am sure, that before it goes to live auction on September 30th, it will need a “salon-day” – as the public is enjoying messing with his mop of hair – in a good way. It’s spreading joy! I love that!

That is the dream! Create art that spreads joy AND ultimately benefits charity. God’s Love We Deliver is an organization that cooks and delivers millions of medically tailored meals for over 10,000 New Yorkers per year, who are living with serious illnesses. It was easy for me to pour hours of my life into creating this cow – the better the cow, the higher the value it will sell for at auction… the more money it will bring into God’s Love. It’s a no-brainer, really. All of the cows are up for auction at Heritage Auctions starting September 7st the live auction ends October 7th.

When we met, Mr. Jerry Elbaum, the founder of the Cow Parade said that this was the most artistically impressive herd of cows he’s ever seen – and this is the 100th staging of this parade… He also said that to the NYTimes… so it wasn’t just to compliment an artist. I believe him.

Working in a studio alongside so many talented contemporary artists had me star-struck at times… I was able to get into my flow state, and ignore the others, thanks to music and my hula hoop… but I am still in awe of the work I saw unfurl over 8 weeks in the studio. There is so much talent in this world! I am honored and proud to be part of this particular herd. #cowparadenyc

Do you have any suggestions for people new to Doodling?

Buy more filament now! Lower your expectations… practice patience… and patiently practice. Oh… and don’t forget you can cut off or meltdown your mistakes.

In an effort to raise more even more money for God’s Love We Deliver Rachel will soon sell some Beyond merchandise on my online art shop – All proceeds will go directly to the charity!

Make sure to follow Rachel on Instagram. She’s always sharing fun art projects and plenty of Doodles. 

Don’t forget to share your favorite Doodles with @3Doodler #3Doodler #WhatWillYouCreate.

2021 Summer Rewind

The summer has flown by and the season for pumpkin spice lattes is officially upon us. As we bid adieu to summer, let’s embrace one last mouthwatering activity.

Ice, Ice Baby

If your ice cream cone never melts, can summer really end? You decide! Whether you are trying to channel your inner creativity, or you are looking for a fun hands-on activity to do with your kids on National Ice Cream Cone Day (Sept 22) – this is the project for you!

  • 3D pen art: Person holding colorful ice cream cone
  • Purple and green ice cream 3D pen art held by someone - Original C Ed D D C Bde E Fa Pxl.
  • 3Doodler art: Pxl araffe ice cream in cone

Here Connie__Doodles whipped up some very realistic ice cream cones using her 3Doodler Create+ 3D pen and our Create+ PLA Pastel bundle of filament.

We did our own variation of this Doodle as well – because….can you really ever have enough ice cream?! Check out this week’s tutorial for some smaller ice cream cones with a few different topping options. Although you can’t eat these, they can be fun kitchen decorations or excellent props for any kid’s kitchen!

Ig

Summer rewind

As summer comes to an official end on September 21st let’s take a moment to reflect back on some of the fun we had Doodling. We did a lot and covered some exciting events, including the launch of our Start+ 3D Pen!


We can’t forget about starting out the summer on a creepy-crawly note with bugs. We also had an awesome cicada Doodle since Billions of Brood X cicadas emerged across the eastern US in the early summer.

Read the blog


We Doodled selfies in June. This fun activity helped turn our photos into real tangible objects. And give us an excuse to have some screen-free time.

Doodle a selfie


STEM week was a big hit. We laid out a week’s worth of STEM activities perfect for a classroom or an at-home Doodle camp. We capped things off with a tutorial on how to draw a robot 3D robot.

Read about STEM week


In July, we launched our new START+ 3D printing pen. With a new design, quicker charging time, 50% more Eco-Plastic and an all-new activity guide featuring 10 projects, any kid who opens this package will experience success right out of the box. We also shared a tutorial of an exclusive Doodle from the activity guide – a dream catcher.

Doodle a dream catcher


It was a whale of a time when we headed to the beach in July. In addition to sharing ideas about how to spend your time at the beach we also shared how to Doodle some sea life, you might stumble upon when you’re there.

Doodle some sea life


We got ready to head back to school. In this fun blog, we showed you ways you could create your own style using Doodles. And how to Doodle a shiny apple for your new teacher.

Doodle some sea life


There were many more, but these were our favorites. In case you missed any of our blogs this summer or want to go back and revisit your favorites not seen above see every blog here and every tutorial here.

Don’t forget to share your pirate get up with @3Doodler #3Doodler #WhatWillYouCreate.


5 Talk Like A Pirate STEAM Activities

Some of the most common pirate imagery we have comes from pop culture references such as Captain Hook from Peter Pan or Jack Sparrow from Pirates of the Caribbean. With International Talk Like a Pirate Day taking place September 19, here are 5 hands-on STEAM activities for your kids and students to have fun with this week.

Blackbeard Capture

1. Read Pirate-Themed Books

There are plenty of pirate-related books to have your kids dive into as they work on their reading comprehension. Here is a list of books corresponding to different reading levels so everyone can enjoy some pirate lore. For younger kids, “read aloud” sessions are great practice. For older kids, have them extend the story by illustrating an alternate ending using their 3Doodler!

Elementary School Reading 

Middle School Reading

High School Reading 

2. A Linguistic History

International Talk Like a Pirate Day started as a joke between two friends in Oregon and has turned into a cultural holiday over the years.

Interestingly enough, the common pirate word “Arrr!” which translates to “yes” was not originally a pirate word at all. While it was introduced into folklore in the 1930s, it didn’t become mainstream until Disney popularized the interjection with its 1950s release of Treasure Island.

Here is some pirate lingo and jokes to help you participate in this fun holiday. Feel free to use this lingo to create your own DIY greeting cards for friends, family, and teachers using your 3Doodler 3D pen.

Ahoy! – “Yo!”
Avast! – “Check it out!”
Aye! – “Yes.”
Arrr! – “That’s right!” (often confused with arrrgh…)
Arrrgh! – “I’m VERY miffed.”

Pirate jokes: 

Q: How much did the pirate pay for his piercings?
A: A buck-an-ear.

Q: How do you make a pirate really mad?
A: Take away the ‘p’.

Q: What’s a pirate’s favorite movie?
A: Booty and the Beast.

Q: Why couldn’t the 10-year-old go to the pirate movie?
A: Because it was rated arrrrrrr.

Q: What was the pirate’s name that had no legs or arms and fell overboard?
A: Bob.

DIY 3D Pirate Flair 

Last but not least, in order to help everyone celebrate and play pirate today, here are some Doodle ideas!

3. Doodle a Pirate Eye Patch 

Many assume pirates wore eye patches to cover a missing or wounded eye from battle but did you know that an eye patch was more likely to be used to condition the eye to be able to fight in the dark? Doodle this eye patch so you can be ready for anything, day or night!

4. A Pirate’s parrot

Can you believe that parrots weren’t actually common pets for pirates? We have the movies to thank for this common misconception. Although parrots were not kept as pets, talking birds did exist and were often stolen by pirates because of their value. Here’s an adorable parrot stencil and tutorial to Doodle for your shoulder – perfect for your next pirate-themed party.

Blog Feature Image Main

5. Avast – a Doodled Telescope!

If you want to complete the part, Doodle your very own telescope so you can scan the horizon for desert islands.

Don’t forget to share your pirate get up with @3Doodler #3Doodler #WhatWillYouCreate.

Ultimate College 3D Pen Projects That Will Transform Your Dorm Room

The ultimate guide to creating 6 projects with your 3Doodler 3D pen that are purposeful, creative, and ~aesthetically pleasing~ without breaking the bank!

Asian woman creating 3D pen art at a table

As many of you are heading out to college this September, we wanted to take the opportunity to talk to you about how to decorate your space on a student budget!

The good news is, if you have a 3Doodler pen already, then you have a great tool on your hands that’ll allow you to create practical and personalized creations perfect for your new space.

Here is our list of favorite dorm projects to do with a 3D pen!

1. Create personalized wall decorations!

Wall Art Wall Art

Chances are you’ll have plenty of bare wall space. This is where you could buy an expensive wall tapestry. Or you can use your 3D pen and our free stencil and Doodle your own!

You can download a free stencil for this project here. Check out the tutorial here

Cost of materials: $7.99 (1 25-pack of PLA plastic)
Retail price: $39.00
Saved: $31 or 79%

Extra tips
  • Preferred plastics: PLA 

2. Easily organize all of your cords by creating your own cord holder!

Cord Holder Cord Holder

Today everything needs a cord, especially at your desk. If you’re anything like us, they tend to get tangled up in one another and can clutter up your space pretty quickly. It’s easy to Doodle your own cord holders similar to these with your 3D pen, and stick them anywhere you want!

You can download a free stencil for this project here.

Cost of materials: $0.32 each (1 strand of filament)
Retail price: $4.99 each
Saved: $4.67 or 86%

Extra tips
  • Color code your cord holders by using different colors of plastic.

  • Preferred plastics: ABS or FLEXY

3. Create the perfect accessory to hang all of your favorite photos!

Photo Hanger Photo Hanger

Why buy an expensive photo hanger like this from the store, when you can create your own custom version that will reflect your personal style? This project will completely transform your dorm, and we love using it to store all of our favorite photos and memorabilia!

You can download a free stencil for this project here.

Cost of materials: $7.99 (1 25-strand pack of PLA or ABS)
Retail price: $21.51
Saved: $13.52 or 63%

Extra tips
  • Simply retrace the outer frame to add more sturdiness.

  • Use the holes on the corners to hang it onto the wall!

  • Recommended plastics: ABS

4. The ultimate project to add that ambiance you never knew you needed!

Lotus Flower Lamp Lotus Flower Lamp

Your friends will be completely envious of your dorm with the beautiful DIY version of this lotus light! Just add an LED candle in the middle to add a laid-back vibe to your room.

You can view the video tutorial here and download a free stencil for this project here.

Cost of materials: $14.99 (1 75-strand Collection of PLA or ABS)
Retail price: $83.71 each
Saved: $68.72 or 82%

Extra tips
  • To create curved lotus petals, simply trace and Doodle over the stencil using a mason jar.

  • Preferred plastics: PLA

5. Never lose your keys & keep your jewelry organized

Jewelry Tree Jewelry Tree

This jewelry tree is very simple to make, and it checks the boxes of being functional and decorative.

You can view the video tutorial here and download a free stencil for this project here.

Cost of materials: $9.99 (1 25-strand pack of WOOD filament)
Retail price: $20.98 each
Saved: $10.99 or 52%

Extra tips
  • Use the holes in the tree stencil to put your earrings!

  • If you want to Doodle a tree with a more circular base, simply use a bottle cap and trace around it until you get your desired tree height!

  • Preferred plastics: WOOD

6. A project inspired for the Doodler who appreciates minimalistic vibes!

Orb Lights Orb Lights

If you want an item in your dorm that pulls everything else together and adds style to your space, this orb light project is perfect for you! Grab a friend and you can finish the entire project in no time.

You can view the video tutorial here.

Cost of materials: $14.99 (1 75-strand Collection of PLA or ABS)
Normal price: $39.99
Saved: $25 or 63%

Extra tips
  • If you don’t want to use the method shown here, you can Doodle on two halves of a tennis ball, and then fuse them together to make one whole sphere.

  • Preferred plastics: PLA

Overall, we saved a total of $154 (or 73%) on these 6 items!

Finding creative ways to save money is always something to be proud of! We hope you had fun getting inspiration from things you find in stores or online, and then trying to recreate them on your own at home. With 3Doodler don’t have to sacrifice substance and style for price, and each item you create is sure to be a conversation starter, just wait and see! We hope we’ve inspired you to be creative and try something new for your dorm room this year!

Don’t forget to share your dorm decorations with @3Doodler #3Doodler #WhatWillYouCreate.

Artist Spotlight with Ricardo Martinez

Ricardo Martinez Herrera is a Mexican artist known for combining traditional sculptural techniques with new and experimental materials, practices, and methods. He works in many mediums including sculpture, painting, and photography.

We are currently obsessed with one of his latest projects, involving an out-of-this-world moon sculpture that he Doodled and will be bronze casting. Check out this great interview we had with Riikc recently to check in on him, his current projects, and what he’s been creating with his 3Doodler Create+ 3D pen as of late.

3D pen art of man's face with abundant hair - sculptural masterpiece

Can you please introduce yourself?

— My name is Ricardo Martinez Herrera, and I’m a Mexican artist based in Belgium. Sculpture has been my passion since I was young, and like a lot of people, I took the lockdowns in 2020 as an opportunity to make a living out of my passion.

Can you talk about your artistic process, as well as your inspirations? 

— My inspiration comes from many places— as someone coming from Latin America and now residing in Europe, I have encountered a lot of contrasting experiences, ways of life, and even people that inspire my creations. As for the creative process, it’s all about translating these experiences into geometrical shapes, as well as spicing things up with some anatomical references.

Can you tell us a little bit about the Metztli moon project you’ve been working on? Where did that idea come from?

— To be honest, I tried to find the most complicated way to draw a sphere with a 3Doodler. After a few days of work, the swirl pattern on the sphere began to look really special. Before I knew it, the sculpture started to remind me of a moon painted by an impressionist, and that’s how the project came to be. I feel like sometimes the best plan is having no plan, and these sculptures start revealing themselves organically.

As for the final result, I’m trying to cast this massive moon twelve times in bronze using the lost wax technique. I can already see the 12 metal moons being shown in a gallery, each with its own different shade of bronze, surrounding the spectators. It’s an exciting project, and just some weeks away from becoming a reality.

When did you add 3Doodler 3D printing pens into your artist’s toolbox?  

— I discovered 3D pens in my last year of studies while researching new ways to create sculptures. After testing a couple of different 3d pens on the market, I got my hands on a 3Doodler, and I haven’t let go of my Create+ pen since.

Do you have any suggestions for people new to Doodling?

— Absolutely! I recently gave a workshop on creating art with the 3Doodler, and I found that the best exercise for them was to create many 2D shapes first, such as triangles or squares. After having a good amount of little doodled squares, it becomes easier to put them together and create volumes such as pyramids or cubes! After that, it’s all about patience!

Make sure to follow Rick on Instagram and YouTube. He’s always sharing fun art projects and plenty of Doodles. 

Don’t forget to share your favorite Doodles with @3Doodler #3Doodler #WhatWillYouCreate.

Close-up: 3D pen art cake with sticks design

Get Inspiration in Your Inbox

Sign up to be the first to have our latest 3D pen lessons, stencils, deals, and discounts (yay!) deposited directly in your inbox.

You have Successfully Subscribed!